Horse Pole Bending for Beginners Everything You Need to Know to Get Started
Confused about where to start with pole bending? Discover how to master the 6 pole pattern, avoid common mistakes, and learn how to train your horse step by step.
- What Is Pole Bending?
- Understanding the Pole Bending Pattern
- What Horses Are Best for Pole Bending?
- Equipment You’ll Need
- Teaching Your Horse to Bend the Poles
- Common Pole Bending Mistakes Beginners Make
- Pole Bending Rules and Penalties
- Tips for Improving Your Times
- Pole Bending vs. Barrel Racing: What’s the Difference?
- Getting Started in Competition
- Final Thoughts on Pole Bending
If you’ve ever watched a horse and rider fly through a line of poles with speed, precision, and total trust in each other, then you already know why pole bending is one of the most exciting events in western riding. It’s fast, competitive, and super fun to watch.
Whether you’re completely new to the sport or looking to add a timed event to your riding routine, this beginner friendly guide to pole bending will walk you through everything you need to know—from how the event works to training tips, equipment basics, and ways to improve your speed and accuracy in the arena.
What Is Pole Bending?
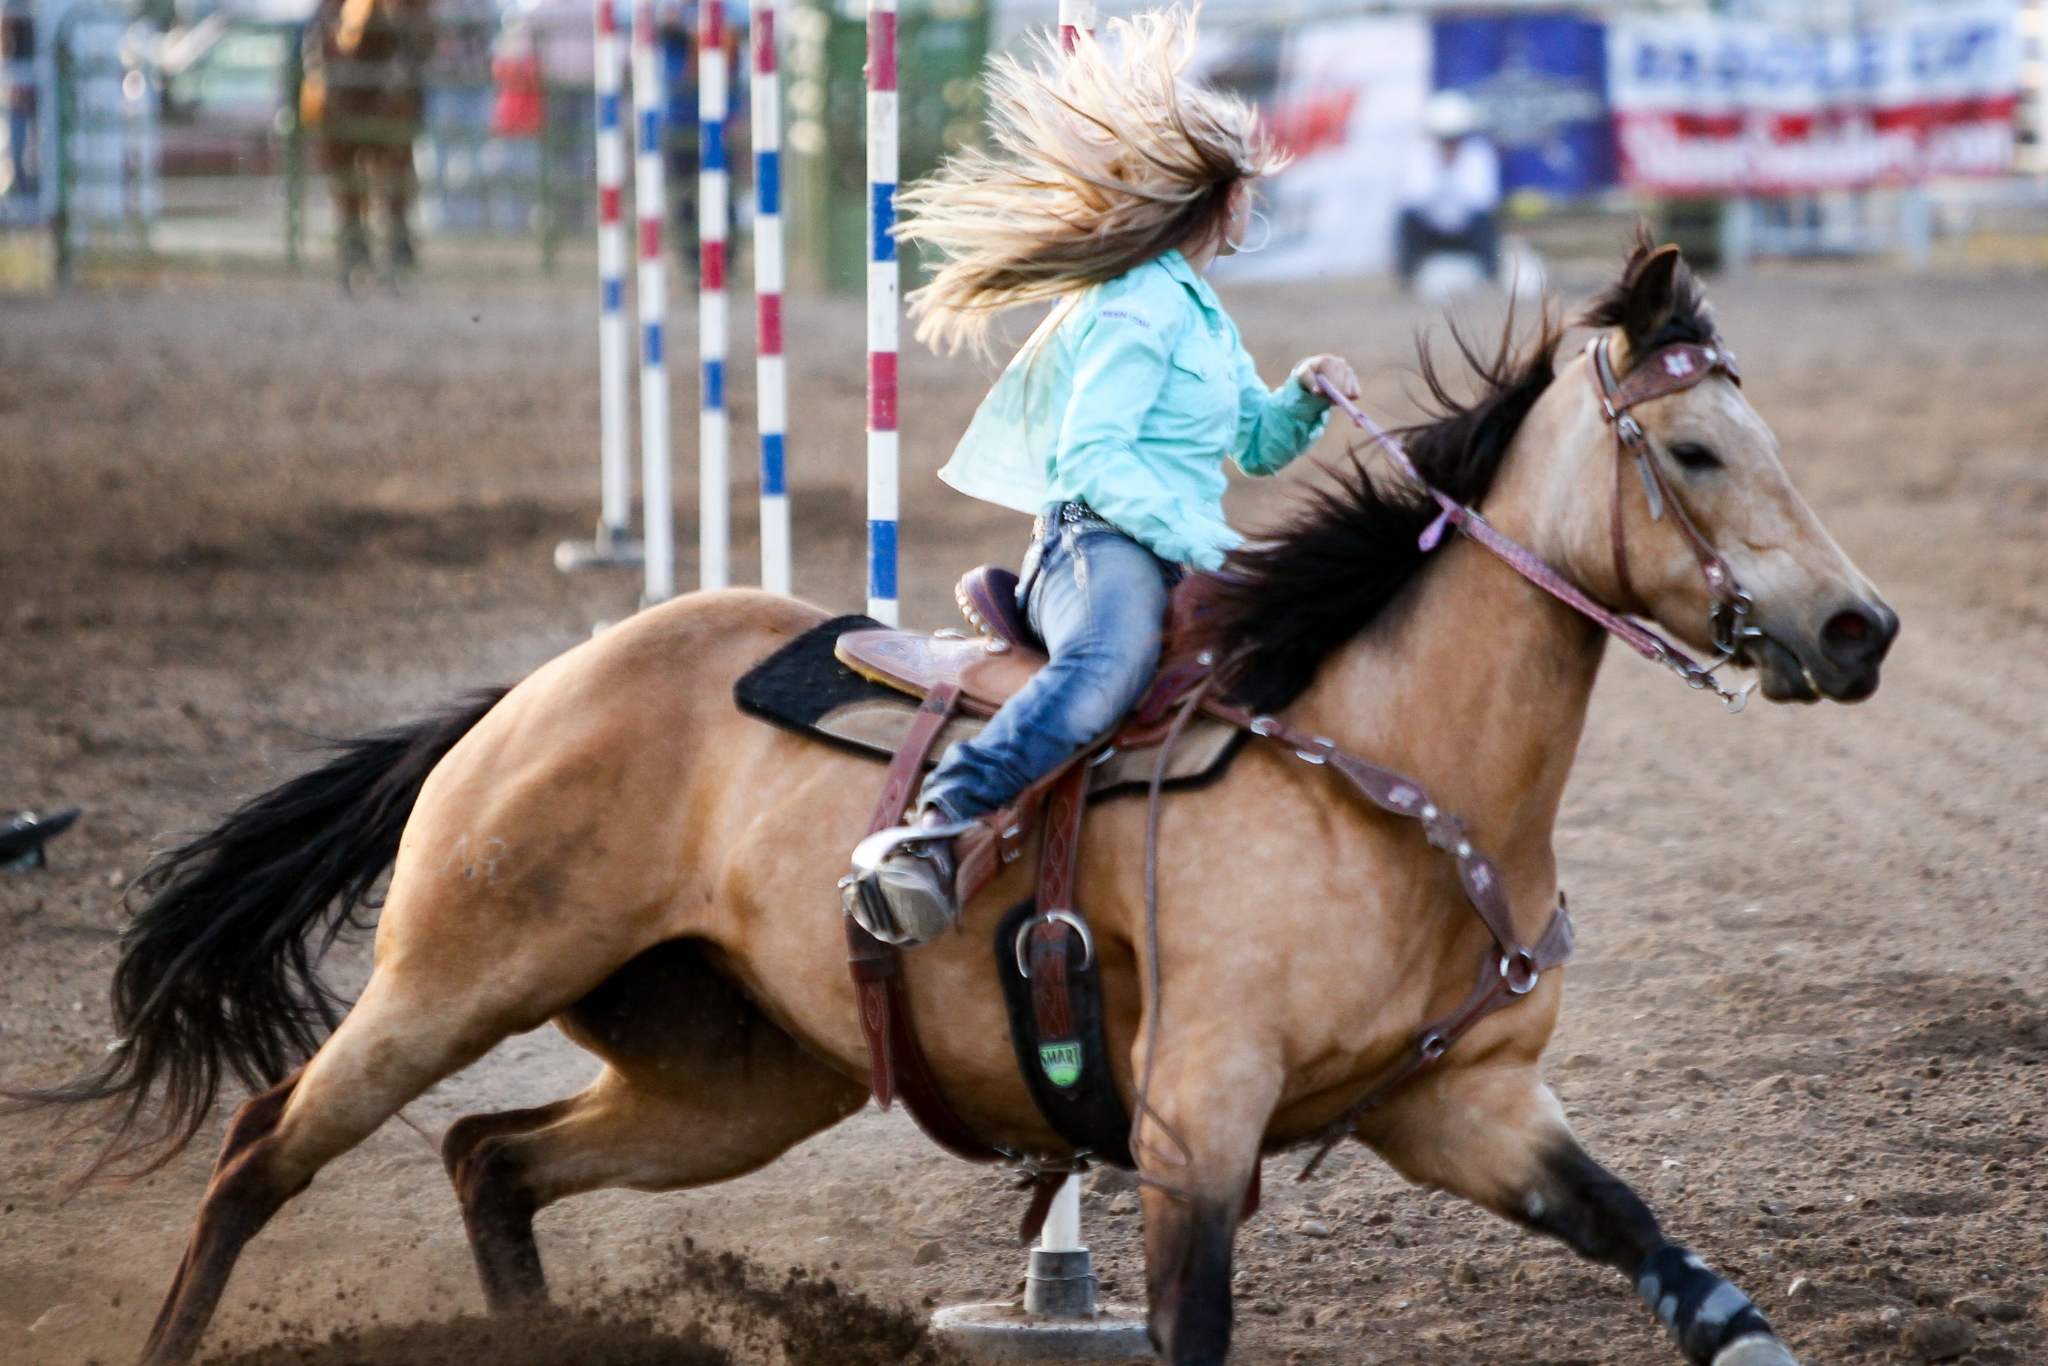
Pole bending is a timed western riding event where horse and rider weave in and out of 6 evenly spaced poles set up in a straight line.
The goal is to complete the pattern as quickly as possible without knocking over any poles. It’s a longtime favorite at rodeos, 4-H events, gymkhanas, and NBHA (National Barrel Horse Association) competitions all across the country.
What makes pole bending so exciting is that it combines speed and precision—and unlike barrel racing’s cloverleaf pattern, pole bending requires horses to smoothly serpentine down the line of poles and back again in one flowing rhythm. It looks effortless when done well—but trust us, it takes serious communication and timing between horse and rider.
Understanding the Pole Bending Pattern
Before you ever climb into the saddle, it’s important to understand exactly how the official pole bending pattern works. Once you see the setup, the flow of the event makes a lot more sense—and building consistency becomes much easier for both horse and rider.
Here’s the standard setup:
- 6 poles are placed in a straight line, each spaced 21 feet apart
- The first pole sits 21 feet from the starting line
- Each pole is typically 6 feet tall and set in a flexible base or cone
- From the start line to the final pole, the pattern stretches about 105 feet total
The Pattern:
- Horse and rider cross the start/finish line heading straight toward the poles
- They pass the first pole, then begin weaving through the line by alternating around each pole
- After weaving through all 6 poles, they turn and weave back through in the opposite direction
- Once they clear the final pole, they sprint straight back across the finish line to stop the clock
Did You Know? Riders can choose to start either to the left or right of the first pole. There’s no “correct” side—the most important thing is staying consistent so both you and your horse can build confidence, rhythm, and muscle memory together.
What Horses Are Best for Pole Bending?
One of the first questions most beginners ask is: “What kind of horse is best for pole bending?” And honestly, the answer is less about breed and more about athleticism, responsiveness, and mindset. That said, there are definitely a few breeds that tend to shine in speed events.
Best Breeds for Pole Bending:
- Quarter Horses — basically the gold standard thanks to their explosive acceleration, agility, and quick turns
- Paints — often share Quarter Horse bloodlines and have very similar athletic ability
- Appaloosas — versatile, athletic, and well-suited for western performance events
- Arabian crosses — known for stamina, responsiveness, and quick, nimble movement
But beyond breed, your horse’s individual personality and physical build matters the most. A strong pole bending horse is typically:
- Responsive to leg and rein cues
- Balanced and controlled through tight turns
- Naturally athletic with good flexibility
- Confident and not easily rattled by poles, noise, or fast movement
At the end of the day, the best pole bending horse is one that’s willing, trainable, and enjoys the job. Building trust, consistency, and communication together will always matter more than having the “perfect” breed on paper.
Equipment You’ll Need
Getting started with pole bending doesn’t require a massive investment, but having the right equipment can make training safer, smoother, and way more enjoyable for both you and your horse.
For the Rider:
- A western saddle — barrel saddles and all-around saddles both work great
- Proper western competition attire if you plan to compete, including long sleeves and either a western hat or riding helmet
- Riding boots with a heel to help prevent your foot from slipping through the stirrup
- A comfortable pair of riding gloves for extra grip and control
For the Horse:
- A properly fitted western bit—many riders start with a snaffle during training before transitioning to a shank bit as the horse advances
- Splint boots or sports boots to help protect the legs from accidental pole strikes
- Bell boots for added hoof protection, especially on the front feet
- A well-fitted saddle pad for comfort and stability during fast turns and acceleration
The Poles:
- 6 poles that are each 6 feet tall
- Weighted bases or flexible safety cones (which are especially great for training)
- A measuring tape to make sure poles stay evenly spaced at 21 feet apart
- Ground markers or spray paint to help maintain consistent spacing in your practice setup
PRO TIP: Having a safe, correctly measured setup makes a huge difference when you’re building confidence, rhythm, and muscle memory—especially during those early stages of training. Consistent spacing helps both you and your horse learn the pattern correctly from day one, which makes progressing to faster runs so much smoother later on.
Teaching Your Horse to Bend the Poles
Training a horse for pole bending is definitely a process, and patience really matters. Trying to rush speed too early is one of the quickest ways to create bad habits, frustration, or a horse that loses confidence in the pattern altogether. The goal is to build understanding, rhythm, and trust step by.
Step 1: Introduce the Poles at a Walk
- Start by setting the poles at regulation spacing and simply walking your horse around them.
- Keep things calm and low pressure so your horse has time to look at, sniff, and get comfortable around the poles.
- Practice in both directions and reward relaxed, forward movement.
Step 2: Practice Bending at a Walk
- Once your horse feels confident near the poles, start slowly weaving through the full pattern at a walk.
- Focus on smooth, balanced turns around each pole—your inside leg helps guide the horse around the turn, while the outside rein supports the arc and keeps the shoulder lifted.
PRO TIP: This is where good habits are built—don’t let your horse cut corners or rush through the turns, even if you’re eager to add speed. Focusing on clean, correct movement now creates a stronger foundation and makes fast, smooth runs much easier down the road.
Step 3: Move to a Trot
- When the pattern feels consistent and relaxed at the walk, you can begin trotting it.
- The goal stays the same: balanced turns, steady rhythm, and accuracy.
Did You Know? Many experienced trainers spend weeks trotting poles before ever introducing speed, because this stage is where horses build muscle memory and learn proper foot placement.
Step 4: Introduce the Lope
Once your horse can confidently trot the pattern, you can begin loping it slowly—and this is where a lot of beginners accidentally rush things.
Fast doesn’t equal better slow—a controlled lope with clean turns is far more valuable than a messy run with no balance or control.
Step 5: Add Speed Gradually
- Only start increasing speed once your horse can consistently lope the pattern cleanly and confidently.
- Let speed come naturally as your horse becomes stronger, more balanced, and more comfortable with the footwork.
- Trying to force speed too early usually leads to dropped shoulders, missed turns, and knocked poles.
Helpful Training Tips:
- Always warm up with slower work before attempting full-speed runs
- Avoid running the entire pattern every single ride so your horse doesn’t become bored or start anticipating
- Break the pattern into smaller exercises, like practicing one tight turn, straight approaches, or smooth rollbacks
- Finish each training session on a positive note, even if it’s something small
Remember: Consistency, patience, and correct fundamentals will always beat rushing for speed. The fast times come later—the foundation comes first.
Common Pole Bending Mistakes Beginners Make
Learning to recognize these common mistakes early will save you a lot of time, frustration, and knocked poles later on. Pole bending is all about building a strong foundation first—speed comes after the basics are solid.
1. Going Too Fast Too Soon
This is probably the biggest beginner mistake. Speed should always be the last thing you add. If your horse doesn’t fully understand the pattern at a slow pace, adding speed will only magnify every missed cue, crooked turn, and balance issue. Slow and correct always wins in the long run.
2. Cutting Poles Too Wide or Too Tight
Wide turns waste valuable time, but overly tight turns can knock poles over or throw your horse off balance. The goal is finding that perfect arc: close enough to stay efficient, but smooth enough to maintain rhythm and control through every turn.
3. Losing Your Position in the Saddle
Your horse can’t stay balanced if you aren’t balanced first. Leaning too far into turns, collapsing forward, or getting left behind during acceleration can make the pattern much harder for your horse to navigate. Practice staying centered and secure, especially at slower speeds before adding speed.
4. Using Inconsistent Cues
Horses thrive on consistency. Try to use the same leg pressure, rein cues, and body positioning each time you ask for a turn or acceleration. Mixed signals create confusion—and confused horses tend to knock poles.
5. Skipping Warm-Up
Never ask your horse for speed work without warming up first. Start with walking and trotting to loosen muscles, improve focus, and mentally prepare both of you for the workout ahead. A proper warm-up helps reduce the risk of injury and usually leads to better runs overall.
6. Overtraining the Pattern
Running poles over and over every ride can make horses anticipate, rush, or become bored with the pattern altogether. Mix things up with trail rides, flatwork, transitions, and other exercises to keep your horse mentally fresh, relaxed, and motivated.
Remember: At the end of the day, pole bending is about partnership just as much as speed. Building confidence, consistency, and trust together will always create stronger runs than trying to rush the process.
Pole Bending Rules and Penalties
If you’re planning to compete, it’s important to get familiar with the rules before you ever enter the arena. While specific rulebooks can vary slightly between organizations like NBHA, 4-H, and local rodeo associations, the basics of pole bending stay pretty consistent across the board.
Here are a few of the most common rules competitors need to know:
- Knocked pole: most organizations add a 5 second penalty for every pole that gets knocked down
- Wrong pattern: running the pattern incorrectly usually results in a no-time, meaning the run doesn’t count
- Starting before the signal: crossing the start line before the signal may lead to added time penalties or disqualification depending on the event
- Breaking the pattern: missing a pole or weaving incorrectly through the sequence typically results in a no-time
PRO TIP: Always take a few minutes to review the rulebook for the specific organization or event you’re competing in. Even small differences between associations can affect your run, so knowing the details ahead of time helps you feel more confident, avoid unnecessary penalties, and stay focused on riding a smooth, successful pattern.
Tips for Improving Your Times
Once you’re running the pattern consistently and cleanly, you can start focusing on shaving seconds off your time. This is where refinement really makes a difference—small adjustments can lead to big improvements.
1. Run a straight, fast approach
Your approach to the first pole should be direct and energetic. Aim to stay straight and balanced, and don’t start your turn until you’re in the correct position beside that first pole. A clean setup sets the tone for the entire run.
2. Maintain momentum through turns
The fastest riders don’t dramatically slow down at each pole—they carry controlled speed through smooth, efficient arcs. Think flow over brakes.
3. Work on your horse’s flexibility
A more supple, laterally flexible horse can bend tighter while staying balanced. Flatwork exercises like leg yields and shoulder-in can dramatically improve how easily your horse navigates each turn.
4. Ride forward, not backward
A common beginner habit is to pull back through the pattern. Instead, focus on riding forward with confidence. Excessive pulling can disrupt rhythm, slow you down, and make turns less efficient.
5. Video your runs
One of the best improvement tools is simple: film yourself. Watching your runs helps you catch timing issues, wide turns, or position problems that you might not notice while riding.
6. Compete regularly
Experience is everything. The feel of a show environment—the nerves, the energy, the pressure—can’t be fully replicated at home. The more you compete, the more comfortable and consistent you and your horse will become.
Pole Bending vs. Barrel Racing What’s the Difference?
Since both are popular timed events in western riding, beginners often wonder how pole bending compares to barrel racing—and while they share similarities, the feel of each event is actually quite different.
Here are the main differences:
- Pattern: Barrel racing uses a 3 barrel cloverleaf pattern, while pole bending follows a straight line of 6 poles
- Distance: Pole bending typically covers more linear ground across the arena
- Rhythm: Pole bending demands a steady, continuous weaving rhythm, while barrel racing is built around 3 distinct, powerful turns
- Difficulty: Many riders consider pole bending slightly more technical because it requires a consistent serpentine flow from start to finish
Many riders enjoy competing in both events since they develop different skills—barrel racing emphasizes explosive turns and acceleration, while pole bending focuses more on rhythm, balance, and precision.
Getting Started in Competition
When you feel ready to compete, finding your first event is easier than you might think—and there are plenty of welcoming places to start:
- Local gymkhanas: These are often the best entry point for beginners. Held monthly in many areas, gymkhanas are low pressure, friendly, and affordable, making them perfect for gaining experience and confidence in the arena.
- 4-H clubs: For younger riders, 4-H offers a structured pathway into pole bending competition at both county and state levels, along with valuable horsemanship education.
- NBHA affiliates: The National Barrel Horse Association has local chapters across the country that host open shows featuring multiple speed events, including pole bending. These events are a great way to gain consistent competition experience.
- County fairs and local rodeos: Many include open speed classes where amateur riders can enter and compete alongside others in a fun, community focused environment.
Don’t be discouraged by slow times at your first shows. Every competitive rider started exactly where you are now. Focus on running a clean pattern, staying safe, and having fun.
Final Thoughts on Pole Bending
Pole bending is one of the most rewarding events in western riding. It builds a deep partnership between horse and rider, develops precision and athleticism, and delivers the pure thrill of speed—all in a sport that’s genuinely accessible to beginners of any age.
Start slow, stay patient with your horse, and build your skills step by step. Focus on accuracy before speed, practice the fundamentals consistently, and don’t skip stages in your training. With time and dedication, you’ll go from walking the pattern for the first time to putting together competitive runs that make the whole arena lean forward to watch.
Now go set those poles up—your next great adventure is 105 feet long.